👾 WebGL Scene
Here we are, the WebGL integration you may have been waiting for! Everyone loves WebGL, everyone wants to try it, everyone wants to learn it and for a good reason: it's cooool!

It can be intimidating though, today we'll show you a simple integration with a basic scroll interaction!
If you really want to dig inside WebGL though, we strongly recommend the Three.js Journey Course by Bruno Simon 😉
Prepare the module
We'll need a new SplashCanvas module for our concoction: its first task will be to init THREE.js with a renderer:
Renderer setup
<canvas
    class="c-splash-featured_canvas"
    data-module-splash-canvas
    >
</canvas>
import { module as module } from 'modujs'
import * as THREE from 'three';

export default class extends module {
    constructor(m) {
        super(m)

        // Selectors & data parse
        this.canvas = this.el;
    }

    init() {
        this.initRenderer();
    }

    initRenderer() {
        this.renderer = new THREE.WebGLRenderer({
            canvas: this.canvas,
            alpha: true,
            antialias: true
        })

        // Get canvas dimensions
        this.BCR = this.el.getBoundingClientRect()

        // Store them
        this.sizes = {
            width: this.BCR.width,
            height: this.BCR.height
        }

        this.renderer.setSize(this.sizes.width, this.sizes.height)
        this.renderer.setPixelRatio(Math.min(window.devicePixelRatio, 2))
    }
}
Always cap the pixel ratio at a maximum of 2. It's really performance greedy to go further and it becomes pretty much unnoticeable beyond that even on high-DPI monitors.
Keep in mind we're on the web, it's not Avatar 3 😉
Set the scene
Neat! We have our renderer, now we need to make it work in a render loop. And in order to see if it works, it's better to have something to render, so we add a initScene() method with a simple THREE.AxesHelper object along with some useful stuff (camera, wrapper, etc).
import { module as module } from 'modujs'
import * as THREE from 'three';

export default class extends module {
    constructor(m) {
        super(m)

        // Selectors & data parse
        this.canvas = this.el;
    }

    init() {
        this.initRenderer();
        this.initScene();

        // Start the render loop
        this.render();
    }

    initRenderer() {
        this.renderer = new THREE.WebGLRenderer({
            canvas: this.canvas,
            alpha: true,
            antialias: true
        })

        // Get canvas dimensions
        this.BCR = this.el.getBoundingClientRect()

        // Store them
        this.sizes = {
            width: this.BCR.width,
            height: this.BCR.height
        }

        this.renderer.setSize(this.sizes.width, this.sizes.height)
        this.renderer.setPixelRatio(Math.min(window.devicePixelRatio, 2))
    }

    initScene() {
        // ==========================================================================
        // BASICS
        // ==========================================================================
        // Our main container
        this.scene = new THREE.Scene();

        // A THREE.Group wrapper is a useful tool for later
        this.wrapper = new THREE.Group();
        this.wrapper.position.set(0,0,0);
        this.scene.add(this.wrapper)

        // Instantiate and add the helper to our scene (param is size)
        const axesHelper = new THREE.AxesHelper( 5 );
        this.scene.add( axesHelper );

        // ==========================================================================
        // CAMERA
        // ==========================================================================
        // We need a camera to see something 👀
        this.camera = new THREE.PerspectiveCamera(30, this.sizes.width / this.sizes.height, 0.01,100)
        this.camera.position.set(15,15,15)
        this.camera.lookAt(0,0,0)
        this.scene.add(this.camera)
    }

    render() {
        // Render
        this.renderer.render(this.scene, this.camera)

        // Call tick again on the next frame
        this.raf = window.requestAnimationFrame(this.render.bind(this))
    }
}
All of that should output something that looks like this:
OrbitControls
It's a bit static, hard to "feel" the 3D aspect. Easy to fix, let's add THREE.OrbitControls! That small tool allows to quickly implement click & drag controls to rotate around around subject and even scroll to zoom!
Make sure to remove the pointer-events: none CSS rule on your canvas to experience OrbitControls features
import { module as module } from 'modujs'
import * as THREE from 'three';
import { OrbitControls } from 'three/addons/controls/OrbitControls.js'

export default class extends module {
    constructor(m) {
        super(m)

        // Selectors & data parse
        this.canvas = this.el;
    }

    init() {
        this.initRenderer();
        this.initScene();

        // Start the render loop
        this.render();
    }

    initRenderer() {
        this.renderer = new THREE.WebGLRenderer({
            canvas: this.canvas,
            alpha: true,
            antialias: true
        })

        // Get canvas dimensions
        this.BCR = this.el.getBoundingClientRect()

        // Store them
        this.sizes = {
            width: this.BCR.width,
            height: this.BCR.height
        }

        this.renderer.setSize(this.sizes.width, this.sizes.height)
        this.renderer.setPixelRatio(Math.min(window.devicePixelRatio, 2))
    }

    initScene() {
        // ==========================================================================
        // BASICS
        // ==========================================================================
        // Our main container
        this.scene = new THREE.Scene();

        // A THREE.Group wrapper is a useful tool for later
        this.wrapper = new THREE.Group();
        this.wrapper.position.set(0,0,0);
        this.scene.add(this.wrapper)

        // Instantiate and add the helper to our scene (param is size)
        const axesHelper = new THREE.AxesHelper( 5 );
        this.scene.add( axesHelper );

        // ==========================================================================
        // CAMERA
        // ==========================================================================

        // Base camera
        this.camera = new THREE.PerspectiveCamera(30, this.sizes.width / this.sizes.height, 0.01,100)
        this.camera.position.set(15,15,15)
        this.camera.lookAt(0,0,0)
        this.scene.add(this.camera)

        // Controls
        this.controls = new OrbitControls(this.camera, this.canvas)
    }

    render() {
        // Update controls
        this.controls.update()

        // Render
        this.renderer.render(this.scene, this.camera)

        // Call tick again on the next frame
        this.raf = window.requestAnimationFrame(this.render.bind(this))
    }
}
The zoom feature is a bit counter-productive in our scrollable environment, you can disable it with this.controls.enableZoom = false straight after instantiating the controls.
The model
We're going to use a Jacket model found on Sketchfab today. We included a modified version (in beautiful red color) in the repository so you don't have to download anything.
Kudos to ypushkar30 for that sick model that almost perfectly matches one of our fake fashion company products 😌
As long as you can get a .GLB or .GLTF for you model somehow, you'll be able to implement today's example. For all we know, you could use a model of the Titanic if that's more your stuff 🚢
3D Models can quickly get heavy, to compress both the vertices & the textures associated with those, we warmly recommend the gltf-transform CLI! Next time you work with a 3d model, feel free to try things with the gltf-transform optimize command and tweak the settings to get a good result.
Add the Jacket to our scene
Let's see how we can load that to our scene now. First we need to give our module acces to the GLB file's src
<canvas
    class="c-splash-featured_canvas"
    data-module-splash-canvas
    data-splash-canvas-src="{{splash_featured.model}}">
</canvas>
To get that data in our module, we can use modularjs' this.getData() function. With the src available we can load our model using the gltfLoader util and then add it to our scene.
import { module as module } from 'modujs'
import * as THREE from 'three';
import { OrbitControls } from 'three/addons/controls/OrbitControls.js'
import { gltfLoader, textureLoader } from '../utils/3d'

export default class extends module {
    constructor(m) {
        super(m)

        // Selectors & data parse
        this.canvas = this.el;
        this.src = this.getData('src'); // Get the GLB filepath
    }

    init() {
        this.initRenderer();
        this.initScene();
        this.loadModel();

        // Start the render loop
        this.render();
    }

    initRenderer() {
        this.renderer = new THREE.WebGLRenderer({
            canvas: this.canvas,
            alpha: true,
            antialias: true
        })

        // Get canvas dimensions
        this.BCR = this.el.getBoundingClientRect()

        // Store them
        this.sizes = {
            width: this.BCR.width,
            height: this.BCR.height
        }

        this.renderer.setSize(this.sizes.width, this.sizes.height)
        this.renderer.setPixelRatio(Math.min(window.devicePixelRatio, 2))
    }

    initScene() {
        // ==========================================================================
        // BASICS
        // ==========================================================================
        // Our main container
        this.scene = new THREE.Scene();

        // A THREE.Group wrapper is a useful tool for later
        this.wrapper = new THREE.Group();
        this.wrapper.position.set(0,0,0);
        this.scene.add(this.wrapper)

        // Instantiate and add the helper to our scene (param is size)
        const axesHelper = new THREE.AxesHelper( 5 );
        this.scene.add( axesHelper );

        // ==========================================================================
        // CAMERA
        // ==========================================================================

        // Base camera
        this.camera = new THREE.PerspectiveCamera(30, this.sizes.width / this.sizes.height, 0.01,100)
        this.camera.position.set(15,15,15)
        this.camera.lookAt(0,0,0)
        this.scene.add(this.camera)

        // Controls
        this.controls = new OrbitControls(this.camera, this.canvas)
        this.controls.enableZoom = false
    }

    loadModel() {
        // Store in a promise to give acces to the preloader
        window.model3dLoadPromise = new Promise(resolve => {
            gltfLoader.load(this.src, gltf => {
                // Add the GLTF to our scene wrapper!
                this.wrapper.add(gltf.scene)

                // Resolve the promise for the preloader
                resolve();
            },
            // called while loading is progressing
            xhr => {
                // console.log( ( xhr.loaded / xhr.total * 100 ) + '% loaded' );
            },
            // called when loading has errors
            error => {
                console.error(error)
                resolve();
            })
        });
    }

    render() {
        // Update controls
        this.controls.update()

        // Render
        this.renderer.render(this.scene, this.camera)

        // Call tick again on the next frame
        this.raf = window.requestAnimationFrame(this.render.bind(this))
    }
}
You'll notice we're using an internal utils file for our gltfLoader & textureLoader. It allows us to only instantiate one of each accross our project. It's not that useful for a one-pager with only one 3D section but it's a good practice and allows for a better readability 😉
assets/scripts/utils/3d.js
import * as THREE from 'three';
import { GLTFLoader } from "three/addons/loaders/GLTFLoader.js";
import { DRACOLoader } from "three/addons/loaders/DRACOLoader.js";

// GLB / GLTF Loader
const gltfLoader = new GLTFLoader();
// Add the DRACOLoader extension to our gltfLoader to be able to decode files compressed with DRACO
const dracoLoader = new DRACOLoader();
dracoLoader.setDecoderPath(
"https://www.gstatic.com/draco/v1/decoders/"
);
gltfLoader.setDRACOLoader(dracoLoader);

// Texture Loader
const textureLoader = new THREE.TextureLoader();

export { gltfLoader, dracoLoader, textureLoader };
Turn the light on!
We can see that the model is loaded now but we're obviously missing some lights! We could add some THREE.AmbientLight or THREE.SpotLight but it requires a lot of work: placing, orienting those and tweaking their colors/intensity ratios is a cumbersome task and we don't have that kind of time... So we're going to use an Environment Map instead! For that we'll use another util: textureLoader.
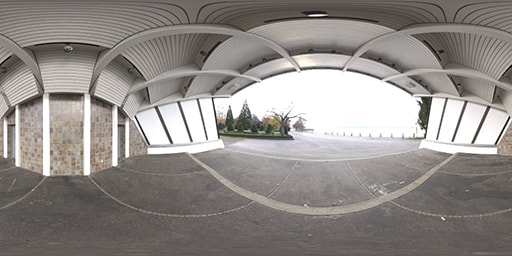
Using environment map textures is a quick & effective way to get advanced lighting setups that feel realistic!
import { module as module } from 'modujs'
import * as THREE from 'three';
import { OrbitControls } from 'three/addons/controls/OrbitControls.js'
import { gltfLoader, textureLoader } from '../utils/3d'

export default class extends module {
    constructor(m) {
        super(m)

        // Selectors & data parse
        this.canvas = this.el;
        this.src = this.getData('src');
    }

    init() {
        this.initRenderer();
        this.initScene();
        this.loadModel();

        // Start the render loop
        this.render();
    }

    initRenderer() {
        this.renderer = new THREE.WebGLRenderer({
            canvas: this.canvas,
            alpha: true,
            antialias: true
        })

        // Get canvas dimensions
        this.BCR = this.el.getBoundingClientRect()

        // Store them
        this.sizes = {
            width: this.BCR.width,
            height: this.BCR.height
        }

        this.renderer.setSize(this.sizes.width, this.sizes.height)
        this.renderer.setPixelRatio(Math.min(window.devicePixelRatio, 2))
    }

    initScene() {
        // ==========================================================================
        // BASICS
        // ==========================================================================
        // Our main container
        this.scene = new THREE.Scene();

        // A THREE.Group wrapper is a useful tool for later
        this.wrapper = new THREE.Group();
        this.wrapper.position.set(0,0,0);
        this.scene.add(this.wrapper)

        // Instantiate and add the helper to our scene (param is size)
        const axesHelper = new THREE.AxesHelper( 5 );
        this.scene.add( axesHelper );

        // ==========================================================================
        // CAMERA
        // ==========================================================================

        // Base camera
        this.camera = new THREE.PerspectiveCamera(30, this.sizes.width / this.sizes.height, 0.01,100)
        this.camera.position.set(15,15,15)
        this.camera.lookAt(0,0,0)
        this.scene.add(this.camera)

        // Controls
        this.controls = new OrbitControls(this.camera, this.canvas)
        this.controls.enableZoom = false
    }

    loadModel() {
        // Store in a promise to give acces to the preloader
        window.model3dLoadPromise = new Promise(resolve => {
            gltfLoader.load(this.src, gltf => {

                // Use envmap instead of ambient light to get nice realistic reflections
                const envMap = textureLoader.load( '/assets/3d/envmap.jpg' );
                envMap.mapping = THREE.EquirectangularReflectionMapping;
                envMap.colorSpace = THREE.SRGBColorSpace;

                // Apply the environment map to the materials
                gltf.scene.traverse((node) => {
                    if (node.isMesh) {
                        node.material.envMap = envMap;
                        node.material.envMapIntensity = 2; // Adjust the intensity if needed
                    }
                });

                // Add the GLTF to our scene wrapper!
                this.wrapper.add(gltf.scene)

                // Resolve the promise for the preloader
                resolve();
            },
            // called while loading is progressing
            xhr => {
                // console.log( ( xhr.loaded / xhr.total * 100 ) + '% loaded' );
            },
            // called when loading has errors
            error => {
                console.error(error)
                resolve();
            })
        });
    }

    render() {
        // Update controls
        this.controls.update()

        // Render
        this.renderer.render(this.scene, this.camera)

        // Call tick again on the next frame
        this.raf = window.requestAnimationFrame(this.render.bind(this))
    }
}
Make it turn
For an even better result, add a rotation increment in the render loop to make it auto-rotate!
render() {
    // Auto rotate our wrapper
    this.wrapper.rotation.y += .01

    // Update controls
    this.controls.update()

    // Render
    this.renderer.render(this.scene, this.camera)

    // Call tick again on the next frame
    this.raf = window.requestAnimationFrame(this.render.bind(this))
}
To improve the feel, you can sync the auto rotate with the scrolling speed and direction! Update the auto-rotate line with the following for a great feel:
this.wrapper.rotation.y +=
    (
        .01 // Base speed
        + Math.abs( // Add current velocity
            (window.locomotiveScrollData?.velocity ?? 0) // Defaults to 0 if locomotiveScrollData is not yet available
            * 0.005 // Dial it down a lot
        )
    )
    *
    (window.locomotiveScrollData?.direction ?? 1); // Apply the direction (either 1 or -1)
And with all that: there it is! Our beautiful jacket in all its glory 😌
Handle resize & destroy
The following code is required and in a real-life production you'd have to go through it. For the purpose of this live-coding workshop though, we're going to skip it as it's not fun to go through and it'll be included in the next snapshot.
We encourage you to come back here after the workshop to go through this.
It's all fun and games until you star resizing your window though.. 😬 We had to handle it for the FancyGallery, we won't escape it here either...
With THREE.js we don't have that much stuff to update to handle resize events. We simply need to tell the renderer and the camera about the new dimensions and it'll take care of the rest. For that, let's use a resize method:
import { module as module } from 'modujs'
import * as THREE from 'three';
import { gltfLoader, textureLoader } from '../utils/3d'
import { OrbitControls } from 'three/addons/controls/OrbitControls.js'
import { CUSTOM_EVENT } from '../config';

export default class extends module {
    constructor(m) {
        super(m)

        // Selectors & data parse
        this.canvas = this.el;
        this.src = this.getData('src');

        // Listen for resize
        this.resize(); // Call a first time before init to get a base sizing
        this.resize = this.resize.bind(this);
        window.addEventListener(CUSTOM_EVENT.RESIZE_END, this.resize);
    }

    init() {
        this.initRenderer();
        this.initScene();
        this.loadModel();

        // Call a second time after init to impact THREE js objects
        this.resize();

        // Start the render loop
        this.render();
    }

    initRenderer() {
        this.renderer = new THREE.WebGLRenderer({
            canvas: this.canvas,
            alpha: true,
            antialias: true
        })

        // Get canvas dimensions
        this.BCR = this.el.getBoundingClientRect()

        // Store them
        this.sizes = {
            width: this.BCR.width,
            height: this.BCR.height
        }

        this.renderer.setSize(this.sizes.width, this.sizes.height)
        this.renderer.setPixelRatio(Math.min(window.devicePixelRatio, 2))
    }

    initScene() {
        // ==========================================================================
        // BASIS
        // ==========================================================================
        this.scene = new THREE.Scene();

        // Wrapper
        this.wrapper = new THREE.Group();
        this.wrapper.position.set(0,0,0);
        this.scene.add(this.wrapper)

        // ==========================================================================
        // CAMERA
        // ==========================================================================

        // Base camera
        this.camera = new THREE.PerspectiveCamera(30, this.sizes.width / this.sizes.height, 0.01,100)
        this.camera.position.set(15,15,15)
        this.scene.add(this.camera)

        // Controls
        this.controls = new OrbitControls(this.camera, this.canvas)
        this.controls.enableDamping = true
        this.controls.enableZoom = false
    }

    loadModel() {
        // Store in a promise to give acces to the preloader
        window.model3dLoadPromise = new Promise(resolve => {
            gltfLoader.load(this.src, gltf => {

                // Use envmap instead of ambient light to get nice realistic reflections
                const envMap = textureLoader.load( '/assets/3d/envmap.jpg' );
                envMap.mapping = THREE.EquirectangularReflectionMapping;
                envMap.colorSpace = THREE.SRGBColorSpace;

                // Apply the environment map to the materials
                gltf.scene.traverse((node) => {
                    if (node.isMesh) {
                        node.material.envMap = envMap;
                        node.material.envMapIntensity = 2; // Adjust the intensity if needed
                    }
                });

                // Add the GLTF to our scene wrapper!
                this.wrapper.add(gltf.scene)

                resolve();
            },
            // called while loading is progressing
            xhr => {
                // console.log( ( xhr.loaded / xhr.total * 100 ) + '% loaded' );
            },
            // called when loading has errors
            error => {
                console.error(error)
                resolve();
            })
        });
    }

    resize() {
        // Get canvas dimensions
        this.BCR = this.el.getBoundingClientRect()

        // Store them
        this.sizes = {
            width: this.BCR.width,
            height: this.BCR.height
        }

        // Udpate the renderer accordingly
        this.renderer?.setSize?.(this.sizes.width, this.sizes.height);
        this.renderer?.setPixelRatio?.(Math.min(window.devicePixelRatio, 2))

        // Update the camera as well
        if(this.camera) {
            this.camera.aspect = this.sizes.width / this.sizes.height
            this.camera.updateProjectionMatrix()
        }
    }

    render() {
        // Auto rotate our wrapper
        this.wrapper.rotation.y += (.01 + Math.abs((window.locomotiveScrollData?.velocity ?? 0) * 0.005)) * (window.locomotiveScrollData?.direction ?? 1);

        // Update controls
        this.controls.update()

        // Render
        this.renderer.render(this.scene, this.camera)

        // Call tick again on the next frame
        this.raf = window.requestAnimationFrame(this.render.bind(this))
    }

    destroy() {
        super.destroy();
        window.removeEventListener(CUSTOM_EVENT.RESIZE_END, this.resize);
        window.cancelAnimationFrame(this.raf)
        this.scene = this.renderer = null
    }
}